Tuesday, July 1, 2014

Recipe: Slow-cooker Breakfast Casserole*

I tried a new recipe this week for an easy, hot and filling breakfast for a crowd if you are heading out on a camping trip sometime this summer, or expecting guests at some point.  It’s called “Slow-Cooker Breakfast Casserole.”  You may have seen versions of this recipe floating around lately.  I sorted through ten or so different similar recipes, taking what I liked here and there and coming up with my own version which I think turned out delicious.  The neat thing is you can throw it together, plug in the crock-pot, and go to bed.  In the morning it’s hot and ready to eat with some fruit and muffins or toast.  I served chunks of cantaloupe and homemade cornbread with honey butter.

Slow Cooker Breakfast Casserole

1 bag (26-28 oz) frozen hash browns 
12 large eggs
1 cup milk
1 teas. ground mustard
1 to 2 lbs. Browned Ground Sausage, drained well (you could substitute bacon or ham)
½ teas. salt and ¼ teas. Black pepper
1 diced red bell pepper
1 bunch sliced green onions
2 small cans diced green chilies undrained
3 cups Shredded medium cheddar cheese

Directions:
- Spray LARGE crock pot on bottom and sides with cooking spray.
- Crack 12 eggs in a large bowl.
- Whisk well and add milk.
- Add the ground mustard, salt, and pepper and mix well.
- Layer everything into the pot in several layers with all ingredients (except eggs) in each layer, starting with hash browns and ending with cheese.
- Pour the egg mixture over everything in the crock pot.
- Turn the crock pot on low for 6-8 hours.

Serve with Salsa if desired.

Serves 8 to 10.

Note:  I think the key to this turning out well is using the best ingredients.  I would recommend Ore-Ida potatoes, either Jimmy Dean or Tennessee Pride Sausage and be sure to get every bit of grease out of your sausage that you can.  Since the grease cooks back into the meat when it is almost browned, be sure to start spooning grease away part way through the cooking process, removing it as you go.  This will make the casserole much more tasty and healthy.

*Originally distributed July 2013

Recipe: Crispy Squash

It’s time to start enjoying the bounty of fresh garden vegetables.  I hope most of you who don’t have a garden of your own will soon be offered some surplus neighbor gifts of that old favorite standby—zucchini.  My favorite zucchini joke is the one that says something like, “Why does everyone lock their car in the church parking lot during the summer?  Because if they don’t it will get filled with zucchini while they’re in church!”

Here’s the thing about enjoying zucchini to the fullest.  You cannot, and I repeat, CANNOT let it get too big.  No one wants those big old watery two foot long boats left on their front porch.  Notice how small the zucchinis are in the grocery store?  Trying to choke down the overgrown specimens with tough skins gives the vegetable a bad name, when it is actually nutritious, versitile, and delicious!

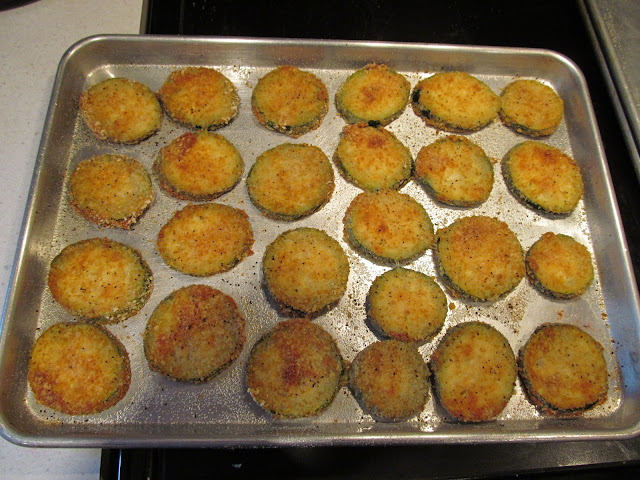
I would have to say that my most loved way to make zucchini or yellow crookneck summer squash is the way my Mom made it for us when we were kids, sliced, breaded, and fried in butter in her cast iron skillet.  The way she cooked it was delicious beyond words; however, when I married and started growing my own squash, I came up with a healthier (and easier) version that we could enjoy more often and without guilt (see recipe below).  I have made untold panfulls of this treat through the years, and we have never grown tired of it.  Even people who claim to hate summer squash seem to enjoy it—especially kids.  We have been known to count them before dinner to make sure everyone gets their fair share.  All you need is zucchini, eggs, cracker crumbs, and butter.  Give it a try!

Crispy Zucchini (or Yellow Squash)
-Medium sized zucchini and/or yellow summer squash, sliced ¼” thick
-Beaten eggs (2 large eggs makes 1 cookie sheet full)
-Finely Crushed Saltine Crackers
-Melted butter
-Salt and pepper

Wash and slice the squash as evenly as possible and place in large bowl.

Beat eggs and crush crackers (I use my food processor—you could also use a blender or place crackers in plastic bag and use a rolling pin).

Spray cookie sheet or sheets with cooking spray.

Place cracker crumbs in a small shallow bowl and eggs in a second.  Don’t add the crumbs to the bowl all at once, just keep refilling or it will get glumpy from the egg and not stick well.

Set up an assembly line with the squash first, then the egg, then the crumbs, then the cookie sheet.  This is a great project for kids to help with. 

First immerse a slice in the egg, then the crackers, coating well on both sides, then onto the cookie sheet.  (Use a fork or wooden skewer to keep your fingers from being coated in egg and crumbs).  Keep going until you have as many as you want or your cookie shets are full, beating more egg and crushing more crackers if you need to. 
Once they are all laid out, drizzle melted butter over them (I just use a small spoon).  It takes about a half a cube of butter or so per pan.  Sprinkle each slice with salt and black pepper.   Bake at 375 degrees for around 40 minutes, not turning.  They will crisp up fine on the bottom as well as the top.  If you want to do two pans in your oven and it’s not a convection oven, rotate the pans part way through to ensure even browning.

Serve as soon as they come out of the oven, as they cool quickly.  If desired, you can dip them in ranch dressing, but we always have them plain as a side dish.

*Originally distributed August 2013

Recipe: Zucchini Casserole*

8 cups of zucchini slices (or mixture of zucchini and yellow crookneck squash)

1 medium chopped onion

Steam this in small amount of salted water until almost done.  Drain WELL and set aside.

For sauce, mix 1 can cream of chicken soup, 1 cup sour cream, 8 oz (about 2 cups) grated cheddar cheese, and ¼ teas. black pepper in large bowl.

Fold zucchini mixture carefully into sauce. 

Mix 1 pkg chicken flavored Stove Top with ½ cube of melted butter.

Place half of this on bottom of square casserole dish that has been buttered or sprayed with cooking spray.  Spoon zucchini over it, then top with remaining Stove Top.

Bake uncovered at 350 degrees for about 30 minutes or until bubbly.  Cover with foil partway through if it’s getting too brown.


NOTE:  This can be made ahead of time and put in fridge until ready to cook; however, then cooking time should be increased by 15 minutes or so.

Originally distributed July 2013

Recipe: Slow Cooker Baked Beans*

Time to get ready for the biggest holiday of the summer! My family 4th of July BBQ will consist of:  Baby Back Ribs (recipe here), Mom’s Potato Salad (recipe here), Red White and Blue Ribbon Salad, Corn on the Cob, Garlic Bread, Watermelon, and Fresh Raspberry Shakes.  Whether you’re attending a pot-luck, hosting dinner for a crowd, or just celebrating at home, eating something delicious outdoors is a big part of summer fun!

Today I'm sharing my tried and true Baked Beans recipe, which is so easy to mix up and forget until time to eat or take to your family picnic. 

Favorite Slow Cooker Baked Beans
4 (15 oz) cans Van de Camps (or other good brand) Pork and Beans
1 lb. Bacon, cooked and crumbled (save drippings)
½ cup Brown Sugar, packed
¼ cup Cornstarch
1 teas. Dry Mustard
½ cup Molasses
1 Tbls. Vinegar
1 large chopped Onion
1 large chopped Green Pepper
1 can crushed pineapple, drained well (optional)
1 Tbls. Bacon Drippings  

Mix cornstarch with dry mustard and brown sugar.  Set aside.  Mix all other ingredients into large crock-pot.  Stir in the cornstarch mixture and mix well.  It will look kind of pale and be quite thick.  Turn on crockpot and cook 6 to 10 hours on low.

NOTE:   Once it is cooked and ready, it helps it thicken up to either let it cool down a bit before serving (doesn’t need to be piping hot) OR serve it the next day rewarmed in a casserole or bean crock in the oven or microwave. If you are making this for a party, it is actually the best tasting and consistency the next day.  (Transfer it into a large dish or bowl and stir occasionally in the fridge while it’s cooling so the center does not remain at an unsafe temperature.)    

*Originally distributed July 2013

Recipe: Bacon Wrapped Jalapenos*

I have a special treat for you this week (to make up for the fact that I’ll be gone the next two).  Because Jalapeno Peppers are on sale at Maceys, I think it’s time to share my sister Stacey’s unbelievably delicious Bacon Wrapped Jalapeno recipe.  Don’t tell her, because she just barely divulged it to me for the first time last Christmas—and that’s only because she moved to Wisconsin and can’t make it for our family parties herself anymore.  If you’re normally a wilting violet when it comes to hot foods and even the thought of ingesting an entire Jalapeno pepper makes you sweat, rest assured that if you follow instructions, the heat from the peppers can be removed completely (or to the extent you desire) leaving only the flavor of the jalapeno behind.  When Stacey makes these, we divide them up from the get-go, so no one is tempted to infringe on anyone else’s share.  I’m just sayin’—make these as appetizers for your next BBQ and everyone will beg for more.  You will be the hit of the party!  You can thank me later.

Jalapeno Bacon Wraps
(makes 36)


-18 fresh jalapenos
-8 oz. pkg cream cheese
-¾ cup grated medium or sharp cheddar cheese
-tops of 2 bunches green onions, peeled and sliced
-18 slices lean bacon, cut into halves
-Bottled BBQ Sauce – (use your favorite kind, but I would suggest choosing one of the nice thick ones such as KC Masterpiece, Bullseye, Sweet Baby Rays etc. instead of just a random store brand.)
-Plastic baggies or gloves to put over your hands when working with jalapenos


-Preheat the oven to 275ºF.

Begin by cutting jalapeños in half lengthwise (I slice off the stems, even though you see them here.)

With a spoon and your well covered fingers, scrape out all the seeds and light-colored membranes. Remember: The heat comes from the seeds and membranes, so remove them all, but be very careful and keep your hands covered!  When you use your disposal to discard the parts you remove, run water while it runs and step away for a minute, as you can literally burn your lungs breathing in the fumes.
Now, in a bowl, combine the cream cheese, cheddar cheese, and chopped green onion. Mix the ingredients together gently with a mixer.


Next, stuff each hollowed jalapeño half with the cheese mixture.


Wrap bacon slices around each half, covering as much of the surface as you can.  Place on cookie sheet.

Brush the surface of the bacon well with your favorite barbecue sauce.

Put them in the oven for 1 hour, or until the bacon is browned and sizzling.  

*Originally distributed June 2013

Recipe: Indian Food*

Today I’m including my recipe for Indian Chicken Curry over Basmati Rice, which I just made a few days ago for two very appreciative men in my life. Nothing makes them happier than this meal (except for when I make Chicken Tikka Masala the same night—call me for this recipe if interested). If you’ve never made Indian food before, this is a tried and true recipe you can trust to turn out well.  I think Indian food is an acquired taste, but once you try it, you start to really enjoy it.  The spices and flavors are unusual at first, but if you’re ready for a new adventure in expanding your family’s food horizons, give it a try!  


Indian Chicken Curry
(See Photo – the Curry is at the front, Tikka Masala at the back)
Serves 5 - 6
  • 1 to 1 ½ lb. Boneless Skinless Chicken Breast or Thighs, cubed
  • 1 very large or 2 medium Onions, peeled and quartered
  • 6 cloves Garlic, peeled
  • 2 medium Green Bell Peppers, seeded and quartered (or 1 red, one green)
  • 12 oz can Tomato Paste
  • 13.5 oz can Coconut Milk
  • 2 teaspoon Salt
  • 1 Tablespoon Curry Powder
  • 1 Tablespoon Garam Masala (Indian Spice Mix)
  • ¼ teas. red pepper flakes (or a bit more if you like it hot)
  • 1 bunch Cilantro leaves, minced
Preparation Instructions
1. Saute chicken cubes in 2 Tablespoons butter until pretty much done.
2. Mince Cilantro in food processor—remove and mince the garlic in the processor.  Leave the garlic and place the onions and peppers in the food processor bowl, grind up, add half the coconut milk and tomato paste and process together until the mix is smooth(ish). Mix this with the rest of the coconut milk and tomato paste in a separate bowl (because it won’t all fit in the processor) and whisk together.  Pour sauce mix on top of the chicken, mix well, and simmer on low heat anywhere from 20 minutes to an hour.  If it seems really thick, add a bit of water to desired consistency. (Note:  If you don’t have a food processor, just chop the vegetables as finely as possible, but it’s better to use a processor if you can).
3. Top with minced cilantro and serve on Basmati rice with Naan Bread*.    

How to make Basmati Rice for 6

2 cup Basmati rice
3 1/2 cups water
scant teas. salt

First you need to rinse the rice.  Place the rice in a large bowl and fill with cool water. Swirl your hand through the water and the rice; the water will go cloudy.  Pour through a wire strainer (or any colander with small enough holes that you won’t lose the rice). Repeat this washing process until the water runs clear. Usually, this takes 3 or 4 changes of water.

Fill up the bowl 1 more time and let the rice soak for 30 minutes.

Drain the rice well.  Put water in a large saucepan, add salt, and bring to a boil.

Add the rice, stir, and wait until the water comes back to a full boil. When it does, turn the heat to low then cover. Cook for 15 minutes.

Turn off heat and let the rice sit for 5 or 10 minutes. Fluff with a fork.

OR if you have one, just use your Rice Cooker.


NOTE:  You can make homemade Naan bread, as there are plenty of recipes on the internet.  I have made it several times, but still haven’t got it quite right.  The last time I made Indian food, I sent someone to buy it from Indian Oven (we like the Garlic kind).  I have also been known to buy raw tortillas, cook them, brush with butter and finish in the oven with minced garlic and cilantro sprinkled on.  Not quite the same, but not bad, and you really can’t have your Indian food without the Naan to scoop it up with!

*Originally distributed June 2013

Recipe: Shrimp Salad*

Happy Memorial Day!  Finally, the first official holiday of summer that we’ve looked forward to all the long cold winter!   I just found out that I’m having 13 guests for dinner on Monday, so I’ve decided to grill hamburgers and make my mom’s delicious Shrimp Salad that everyone loves.  In my family we have quite a few favorite dishes without written recipes, and this is one of those.  My grandmas were great cooks and so is my mom, so family specialties are plentiful—however, they are a little hard to share, since we girls were taught how to make them by our mom—not just handed a recipe on a card.  The shrimp salad, however, is relatively simple; so for those of you willing to take a chance and do some tasting, I’ve described the steps the best I can and I challenge you to give it a try!  If you like pasta type salads and shrimp, I think you’ll enjoy this family favorite.  

Mom’s Shrimp Salad
 
-12 to 16 oz bag of Small Shell Pasta (or small salad macaroni)
-Miracle Whip, Kraft or Best Foods Mayonnaise, or a combination of the two (it will take about a half jar I think)
-Kraft French dressing (not Catalina, just regular French)
-1 large bunch Green Onions, sliced
-1 to 2 cups diced Celery (use tender inner stalks if possible)
-1 can Black Olives, halved
-Half a 16 oz. Bag of Western Family Frozen Petite Peas, cooked
-1/2 to 1 pound of small to medium sized cooked Shrimp (buy these either already cooked, or cook and peel your own)*
Boil the pasta in salted water until just tender—don’t overcook (taste it to see when it’s done).  Immediately drain and rinse well in cold water.  Let continue to drain well in colander while getting dressing ready.   Cook Frozen Peas in a small amount of salted water just until they come to a simmer and drain.  Run cold water over them in colander to cool and set aside.

In large bowl, mix enough French dressing into the Mayo to turn it light peach colored (probably no more than 1/4 of the bottle into the mayo).  Add some salt and black pepper.  Mix into pasta until well coated.  If you don’t have enough, just mix up some more, or don’t use all the pasta.  Or if you have too much dressing, don’t use it all.  It will “drink up” some of the dressing when refrigerated overnight, so you can be quite generous, but don’t overdo it like they do with the commercially prepared salads.  The salad should be a pale peach color.

Now stir in the green onions, celery, olives, peas, and shrimp.  Taste it, add more S and P and/or dressings if needed.  Cover and refrigerate overnight, or at least for a few hours, before serving.

*Note:  To prepare frozen shrimp, remove from freezer and run cold water over it in a colander in the sink.  Remove tails if present, by squeezing gently between thumb and finger until they pop off.   Lay out paper towels and spread shrimp over, then another paper towel on top.  Press gently to remove all water so that the shrimp are nice and dry and won’t get water in the salad.  It’s best not to remove shrimp from freezer until you are ready to prepare for the salad, and once the shrimp has been added to the salad, do not keep longer than three days at most.


*Originally distributed May 2013

Recipe: Easy Oven Eggs Benedict*

Its seems like these last few weeks before summer officially starts is so busy with school ending and yard work beginning, that it’s nice to have some quick and easy meals in mind.  I want to share a recipe I tried the other night, created from several I found on the internet that I call “Oven Eggs Benedict.”  Everyone likes to have breakfast for dinner don’t they?—we often have last minute pancakes or French toast.  This particular recipe, my 15 year old Dylan loved so much that he promptly devoured three, then begged me to make them again.  It made me laugh, since the whole dinner prep took about ten minutes and we ate it in the family room while watching our favorite TV show at nine p.m.—not exactly a shining example of family dinner hour!
Ingredients:

8 count can Jumbo refrigerated Biscuits (any brand)

8 large eggs
8 Portions of Ham (the ham can be slices from the deli or any packaged lunch meat
type)
Grated cheddar cheese
1 packet Hollandaise Sauce mix, any brand

Directions:


-Spray Jumbo Muffin Tins well with cooking spray or grease by hand with

shortening or butter. If you don’t have any of the large tins, you might consider
buying some, as they are nice to have for making jumbo muffins or cupcakes. You
could also substitute oven proof glass custard cups if you have the large sized
ones, OR come borrow my muffin tins, which I would be happy to lend anyone.

-Press the 8 biscuits into tins, covering the bottoms and up the sides as far as

they will go. If your tins have only 6 holes in each like mine do, fill the empty ones
with a little water in the bottoms to keep your pans from warping or burning in the
oven. Or you can just make 6 and not use the remaining biscuits.

-Place some ham or other breakfast meat into the bottom of the biscuits, folding

or cutting the slices as needed to fit down inside.

-Break an egg into each cup over the ham. Salt and pepper eggs lightly. Sprinkle

grated cheese over the top of the egg. The fillings should come to the top of the
tins, making them nice and full.

*Originally distributed May 2013

Recipe: Steak or Kabob Marinade*

It’s almost BBQ time, so get ready to fire up the grill by planning ahead now for your Memorial Day picnic.  This year I think we will have our family favorite Steak Kabobs, with lean Sirloin Steak (on sale at Maceys this week) prepared with my favorite marinade (see recipe below) along with chunks of red and green bell peppers, zucchini and/or yellow squash, white onion, mushrooms, and fresh pineapple (also on sale at Maceys).  I like to steam the vegetables briefly in salted water just enough to soften them slightly so they’ll be moist and ready to eat at the same time as the steak—plus this keeps the mushrooms and peppers from splitting while placing on skewers.  For easy clean-up, use bamboo skewers soaked in a pan  of cold water a few hours so they won’t burn on the grill—make sure the skewers are large and sturdy enough to hold everything.   The kabobs would go great with Dutch oven potatoes, green salad, and garlic bread.  Welcome summer!


Ingredients:

2 pounds boneless sirloin steak
½ cup soy sauce
¼ cup vinegar
3 Tbls. Brown sugar
3 Tbls. Grated Onion
1 Tbls. Vegetable Oil
2-3 minced garlic cloves
Scant ½ teas. ground ginger
½ teas. black pepper
1/3 cup ketchup

Directions:


Cut steak into desired sized pieces for grilling or chunks for skewering onto kabobs with veggies.
Pour marinade meat over in glass container, sealed with tinfoil and lid to keep the garlic smell from coming out in your fridge too much.

Marinade overnight or no more than 24 hours.

*Originally distributed May 2013

Tip of the Week: Saving on Meat*


As meat prices continue to soar, remember that most stores offer day-old packages of meat at substantially reduced prices. I always check the marked down prices on meat whenever I'm out shopping, and always come away with one or two items I feel good about brining home and using right away or freezing. The use-by date is often still a couple of days out, and I've never chosen something that wasn't still perfectly fine. When it comes to high-dollar items like steak, this provides a chance for you to afford something you normally might not consider, such as Rib Eye or T-bone. 

Here's an example: tonight for dinner I'm cooking some odds and ends of salmon fillets that were packaged together and cost less by half than the larger fillets right next to them. If it means we get salmon for dinner, who cares if it's in weird-looking shapes? Not my two guys, who will be thrilled having salmon on a weeknight.

Ground beef in particular is at an all-time high, and Macey's especially has good offerings if you are willing to choose meat ground yesterday instead of today. Another option with ground beef is to select a nice, lean, boneless roast or two (when roasts are lower than $3.00/lb) and ask the meat department to grind it into burger for you.  They will package it up into whatever size packages you request for your freezer. This way you can get some ground beef that will be lean and affordable until prices go back down. 

Best choices are first thing in the morning, so go early before it's gone. 

*Originally distributed April 2013

Easter Eggs and Tips*

I’m sure every family has their traditional Easter Dinner.  Ours is Baked Ham, our special family recipe Potato SaladAsparagus SpearsHome Baked RollsFrozen Fruit Salad, and Strawberry Shortcake for dessert.

This week you can’t go wrong buying Ham at any of the stores—there are some great specials going. 

By the way, I’ve noticed that Spiral Hams always take at least a half-hour or more to heat through than what it tells you on the package.  Even though they usually fully cooked, I would recommend bringing them to the proper internal temperature before serving.

This is a great time of year to get good prices on asparagus; if you have been waiting for your first taste of this delicious spring vegetable, it would be a great treat for your Easter dinner.  Honestly, we love asparagus so much that when all the kids were home I would count the spears and tell them how many they could each have!  Now with just the three of us, we don’t have to fight over the asparagus as much.

After many not-so-perfect boiled egg experiences through the years, I finally came up with a method that seem pretty fool-proof to get Eggs ready to color for Easter:

Carefully place one layer of eggs in bottom of a large pan.  Cover one or two inches over with cold water.  Turn heat to high, and heat just to a strong simmer.  Turn heat to medium for 2 minutes to ensure simmer, then to near low for ten minutes.  Remove from heat.  Run one of the eggs under cold water and peel, then cut in half and check for doneness.  Do this as quickly as you can.  If it’s done, take all the eggs off, drain, and immerse in cold water immediately to stop the cooking.  If they aren’t quite done, leave in hot water (that has been removed from the heat) for up to another five minutes if needed.  Cool all the eggs in cold water, drain and dry, then refrigerate until ready to use or color.

Boiled eggs should be stored in the refrigerator, not left out for more than an hour or two.  Unpeeled eggs will last in the refrigerator for one week.

Note:  Remember that it’s best to use older eggs because they peel much more easily.  So if you haven’t bought your eggs yet, get them as soon as possible. 

*Originally distributed April 2013

Recipe: P.F. Chang's Chicken Lettuce Wraps*

Because all of us enjoy eating out sometimes, I wanted to point out that any dish you love to order in a restaurant can be successfully duplicated at home (with a little internet research and experimentation, that is).  Home versions of favorite restaurant foods are almost always much more healthy--and definitely cheaper.  With this in mind, this week I’m offering my personal no-fail recipe for Chicken Lettuce Wraps inspired by those served at P. F. Chang’s China Bistro.  You may not be familiar with some of the ingredients (neither was I a few years ago), but they can all be found in the Asian Food section at any of our local grocery stores.

Also, I wanted to mention that I have made it a tradition to plan something special for my family to eat over General Conference Weekend which, although usually quite labor intensive, is appreciated and looked forward to, since we only have it occasionally.  I always make enough that we can enjoy it both Saturday and Sunday between conference sessions, and I get most of the prep work done on Friday so I can be ready to watch conference with the fam.  Some of our past favorites include: Real Italian Spaghetti and Meatballs, Café Rio Sweet Pork or Grilled Chicken Salad, Make-Your-Own Individual Baked Pasta or Stir Fry Bowls (with many choices of meat, veggies, and sauces pre-prepared and ready for people to create their individual favorites—then pop in the oven or toss in the Wok).  So if the family will be together for conference, rather it’s just the two of you, the kids and/or grandkids, or a gathering of any number of relatives or friends, it’s fun to make the special bi-yearly weekends in April and October occasions to remember.

Filling:
2 pounds raw chicken (boneless breasts or thighs) ground in food processor or  chopped very small with a sharp knife  
1 pound mushrooms, diced
2 small cans whole water chestnuts, drained and chopped
2 bunches green onions, sliced
3 large cloves garlic, grated or diced fine
Sesame oil for browning
Chinese Rice Noodles or Sticks  

Sauce:
½ cup Hoisin Sauce
½ cup Oyster Sauce
2 Tablespoons Sugar
2 Tablespoons Soy Sauce
Pinch of Ground Ginger

Mix together well in a small bowl.  Set aside.

Do the rice sticks next.  Heat 2 inches of vegetable oil to 400 degrees.  Break the rice sticks apart and throw them in a very few at a time.  They will puff within seconds (if they don’t, you’re either putting too many in, or the oil is the wrong temp)—remove them immediately and drain on paper towels a few at a time.   Set aside.  Note:  You won’t need the whole bag—no more than half.  Save for next time.

For the lettuce, buy two nice heads of lettuce at least a day before.  As soon as you bring it home from the store, wash and drain well upside down, then crisp up in covered tupperwares in fridge.  The day of serving, slice 1/3 to 1/2 of the head off (opposite core end) and separate carefully out into little bowls/cups. Make sure they’re nice and dry.  Put away the rest of the lettuce for another use.  Keep lettuce cups in fridge to keep cool until ready to serve.

Saute chicken in about 2 Tablespoons sesame oil---sprinkle with salt and pepper. Cook until done. Add mushrooms and cook briefly until soft—drain off any liquid. Add garlic and cook another minute. Mix in prepared sauce and green onions.  Cook a minute or two.  Add water chestnuts last.  Remove from heat and keep warm.

Place rice sticks on a large platter and spoon chicken filling mixture over the top.  Put out lettuce and let everyone make their own servings at the table, wrapping around the meat mixture like a burrito, with chicken and rice sticks on each wrap.  This can be used as an appetizer or a main dish.

*Originally distributed March 2013

Recipe: Corned Beef & Cabbage with Irish Soda Bread*

Welcome to the St. Patrick’s issue of “Savings for Sisters.”  What could be better for bringing the Luck of the Irish than a traditional Corned Beef dinner?  Now before you scoff, let me tell you that it took years to perfect my recipe before all the corned beef and cabbage haters among my family and relatives, near and far, were converted and had to admit they couldn’t wait to dig in to this delicious, once-a-year treat, for which I’m going to share instructions with the stout-hearted among you. It's a one-pot meal (crockpot to be exact), and a fun way to celebrate the only holiday in March. I've also included a recipe for some yummy Irish soda bread to go with your meal.

Corned Beef & Cabbage

Ingredients:


3 ½ to 4 ½ lb. Corned Beef Brisket, trimmed of fat (I suggest flat cut, rather than point cut, because it fits better in your slow cooker and will leave more room for veggies)
½ teas. Crushed Red Pepper Flakes
1 can Swanson Chicken Broth
2 tablespoons Worcestershire Sauce

1 very large or 2 medium white Onions
About 10 Large Carrots, peeled and chunked
About 10 to 12 medium Red Potatoes, washed and halved or quartered, not peeled
1 head Cabbage, washed and cut carefully into about 8 wedges
½ to 1 cup fresh Minced Fresh Parsley leaves

½ cup Sour Cream
1 to 2 tablespoons Cream Style Horseradish from jar

Directions:

In a large Crock-Pot, place onions that have been peeled and quartered.
Take Corned Beef from package and rinse well.  Discard Seasoning Packet.  Trim off the thick layer of fat that your brisket will probably have on one side. (Be careful when doing this, and use a sharp knife).

Lay the meat on top of the onions.
Mix Chicken Broth with Worcestershire.  Pour over meat and onion.
Sprinkle red pepper flakes over the meat (up to 1/2 teas.)

Turn crock pot on high for 1 to 2 hours, then turn to low (for total cooking time of about 8 hours).

4 to 5 hours into the cooking time, add veggies:
First carrots that have been peeled and sliced into chunky sticks, then red potatoes halved with peelings on (turn these cut side down), then 6 - 8 wedges of cabbage on top of everything (lay these with the insides down; try to keep them so they don’t come apart and stay in wedges as much as possible). Between each layer of veggies, salt and pepper generously.  If the lid doesn’t fit down tight on the crock pot because you were trying to fit everything in, seal the crock insert over with foil, then place the lid on top of that, and it will soon shrink down enough for the lid to fit down tightly over the pot, and you can remove the foil.

About a half hour before you’re ready to eat, open and spear a cabbage wedge with a toothpick.  If it’s good and done, all the veggies underneath will be done too.  This isn’t a crispy vegi dinner—the cabbage comes out well done and pale green.  

Next, lift the crock out of the cooker, and moving the lid back just enough to hold the dinner in but be able to pour through (hold on TIGHT with hot pads so it doesn’t come slaming down and dump the whole thing—you MUST have a firm grip on things) pour all the juices into the medium sized saucepan (I suggest doing this with the pan sitting down in the sink).  This will be thickened for your gravy.  Put the crock back into the cooker and turn your crockpot on the “keep warm” feature (or if you don’t have “keep warm” on your pot, cover with foil (take off plastic lid) and place in warm oven).

Make some flour thickener with about ½ cup flour and about 2 cups water (add more flour or water to bring to desired consistency—I’m just guessing on amounts here).  Strain out lumps as needed.  When broth is boiling, whisk this in slowly until it’s a gravy that is slightly thin.  This will be poured over the veggies and passed at the table. 

Carefully remove veggies from Crockpot, sectioning them off individually into a huge pasta type (large shallow) bowl.  Pour some gravy over all the veggies, then sprinkle with fresh parsley. The rest of the gravy can be passed.

Lay the meat on a cutting board and slice with an electric knife into thin slices across the grain.  Serve meat with horseradish sauce if desired.

This is enough for 6 to 8 hearty appetites.


Easy Irish Soda Bread


Ingredients:

3 cups flour
1 Tbsp baking powder
1/3 cup sugar
1 tsp. salt
1 tsp. baking soda
1 egg, lightly beaten
2 cups buttermilk
1/4 cup butter, melted

Directions:
Heat over to 325°F.
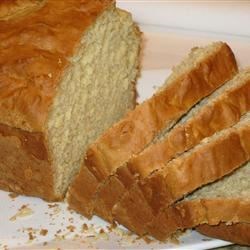
Mix dry ingredients in large bowl. Blend egg and buttermilk together. Add all at once to dry mixture and mix until just moistened. Stir in butter. Pour into 9x5 inch greased loaf pan. Let sit in pay 30 minutes before baking. Bake 65 minutes and let cool. Can be served right away or wrap in foil overnight for best flavor.

*Originally distributed March 2013