I hope lots of you got a chance to take advantage of the great prices at Smith's last week on storage items. I spent several hours organizing my coupons for additional savings on the already rock-bottom prices on Land O' Lakes Butter, Carnation Evaporated Milk, and Campbell's Cream Soups, to name a few. This is a good example of how you can't just assume that case lot sales are the best time to stock up on storage items. I was glad to see that the Smith's ad for this week is repeating some of these best buys, so it isn't too late to snag these deals before they're gone. Take a close look at the Smith's listing below.
Thanksgiving is just around the corner, so I thought I'd share my favorite homemade roll recipe. I cut this out of the newspaper probably 25 years ago when I first got my bread mixer, and it has served me well all these years. If you don't have a bread mixer, the dough can of course be kneaded by hand. If you haven't attempted roll making before, this would be a good recipe to try, as it's very easy and takes basic ingredients to make light, fluffy rolls that will really make your Thanksgiving dinner special.
Nice as it would be to have hot rolls fresh from the oven just as Thanksgiving dinner is being placed on the table, this is impossible--at least for me. For one thing, I don't have room for rolls to bake on Thanksgiving with all the other dishes taking up oven space. So I have gotten into the habit of making rolls ahead of time, which I did today so I could take photos of the process for you. Placed in freezer bags as soon as they cool, I can thaw these out on Thanksgiving morning, warm them carefully in a foil covered pan for a few minutes once the other pans are out of the oven, and I guarantee no one will know they are not freshly made that morning. Thanksgiving is a little over two weeks away, but I'm confident these rolls will still be delicious--and I already have one task complete which will make my Thanksgiving much easier. If you would like to try my easy roll recipe for your family this year, see my photos and instructions below.
Nice as it would be to have hot rolls fresh from the oven just as Thanksgiving dinner is being placed on the table, this is impossible--at least for me. For one thing, I don't have room for rolls to bake on Thanksgiving with all the other dishes taking up oven space. So I have gotten into the habit of making rolls ahead of time, which I did today so I could take photos of the process for you. Placed in freezer bags as soon as they cool, I can thaw these out on Thanksgiving morning, warm them carefully in a foil covered pan for a few minutes once the other pans are out of the oven, and I guarantee no one will know they are not freshly made that morning. Thanksgiving is a little over two weeks away, but I'm confident these rolls will still be delicious--and I already have one task complete which will make my Thanksgiving much easier. If you would like to try my easy roll recipe for your family this year, see my photos and instructions below.
1/2 cup
Shortening
12 to 14 level cups of flour
1 cup sugar
5 teaspoons
salt
4 large eggs
4 2/3 cups warm
(not hot) water
4 scant Tablespoons
Instant Yeast
1 1/2 stick melted
butter
Note: This recipe is the right amount for my large Bosch bread mixer. If you have a smaller mixer, such as a Kitchen Aid stand mixer, you should cut the recipe in half. Of course you can knead the dough by hand, but I have never learned to do this well, so I don't have any good tips or instructions about this for you.
Melt shortening in microwave and allow it to cool (but not to the point that it resolidifies). Place a plate underneath in case it overflows when it melts.
Put water, sugar, and salt in bread mixer and spin around
once or twice to dissolve.
In separate bowl, mix together about 4 cups of the flour and the instant yeast. I use a product called Saf-Instant. It comes in a square red package and is in the baking aisle at Maceys. I have never used any other type of yeast, so I'm not sure how the recipe would work with non-instant types.
Add the flour and yeast mixture to the mixer while it’s turning.
Immediately add eggs, which are cracked in a bowl and waiting, then start adding some of the rest of the flour (which has been pre-measured) as well as drizzling in the cooled shortening.
After gradually adding the flour, Let the mixer go for 3 or 4 minutes, then decide whether it needs more flour.
This is how it looks after adding a total of 12 level cups of flour. This looks like it needs a cup or two more flour. While the mixer is running, grease a large bowl with shortening to be ready for the dough.
Run
mixer for a total of 10 to 12 minutes. You don't want to add more flour after the first 5 minutes or it won't turn out as well, so after about 4 minutes stop the mixer and look at and feel it. I added an additional 1 1/2 cups flour after it had been mixing 4 minutes because I could see it was going to be too sticky and needed a bit more. This is how it looked after running the mixer for the full 10 minutes:
This may look sticky still, and it is, but if you overdo the flour the rolls will be tough and heavy. Once it is raised, it will be just right for rolling out and you will be able to handle the dough. See how it mostly pulls away from the sides of the bowl, but some is still clinging on? At this point rub your hands with shortening as if you were putting on lotion and take the dough out of the bowl, making sure to get it off the dough hooks and sides of the bowl. Place it in the prepared bowl.
Cover well with plastic wrap and place in fridge for 45 minutes to raise. You will most likely have to make room in your fridge for this big bowl. In the winter you can raise it somewhere cool like your garage if you don't have fridge space. This is the only recipe I have ever seen that raises the dough where it is cool instead of warm, and I don't question why, because it always comes out great!This may look sticky still, and it is, but if you overdo the flour the rolls will be tough and heavy. Once it is raised, it will be just right for rolling out and you will be able to handle the dough. See how it mostly pulls away from the sides of the bowl, but some is still clinging on? At this point rub your hands with shortening as if you were putting on lotion and take the dough out of the bowl, making sure to get it off the dough hooks and sides of the bowl. Place it in the prepared bowl.
While the dough is raising, prepare your counter top for rolling out the dough by washing, rinsing, and drying it well with paper towels. Grease your pans and have them ready. Once the dough comes out, you want to be able to move quickly or it will raise too much while you're trying to get all the rolls made. You want to be as prepared as possible.
Now sprinkle flour on your counter and get your rolling pin and pizza cutter out. Make sure to not put too much flour--just a thin layer. Too much flour now may help you handle the dough, but you will be disappointed with the final product. Smooth it out evenly with your hand.
When the dough in the fridge has doubled or more in size (about 45 minutes to an hour), remove it and divide into four portions.
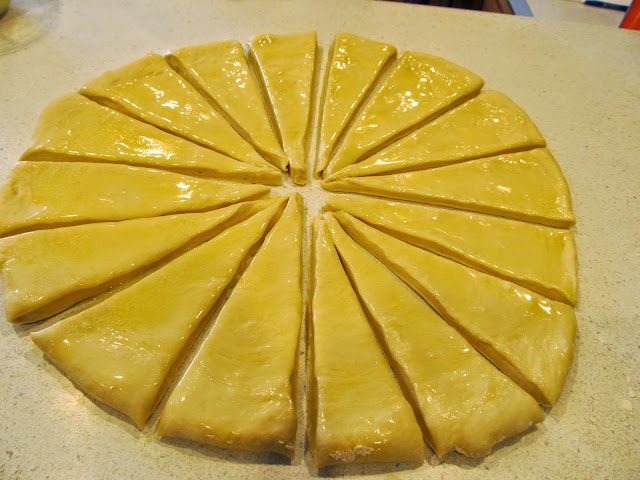
Cut into 16 triangles with your pizza cutter as you would a pizza. First cut in half, then into fourths, then eighths, then sixteenths. If you want bigger rolls, just divide it into 12 instead.
Starting at the fat end and moving towards the point, roll the pieces up into crescent shapes. I actually use two hands to do this, but no one was home to help me take pictures, so I was holding the camera with the other hand!
Place rolls on cookie sheet, making sure the point is tucked under, leaving room to spread. In between rollings, clean drips of butter off the counter with a dry paper towel, lightly dust again with flour, then do the next portion of dough. Work as fast as you can so the remaining dough won't over raise.
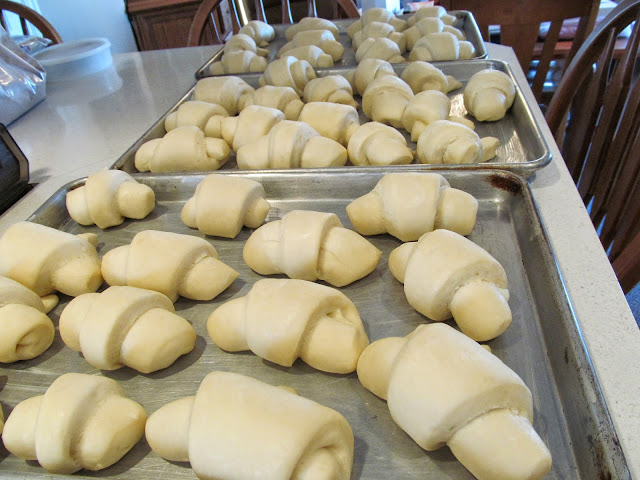
Place the pans in a warm place to raise for about an hour. If your kitchen is warm, the counter is fine. Don't cover them.
Here's how they look when they're close to being ready for the oven. Set the oven (or ovens if you have more than one) to 375 degrees.
Bake for 10 to 12 minutes, then butter the tops with the remainder of the melted stick and a half of butter.
Remove to cooling racks. It should make about 50 to 60 rolls, depending on how big you make them.
Serve right away or place in freezer bags when they are entirely cool. Thaw before rewarming at 350 degrees for about 10 minutes in covered pan. My rolls are now ready for Thanksgiving. Yay!
Do you have a boy similar to this one around the house? For heaven's sake, make him some rolls!


This may be my favorite post yet! Love it. ;)
ReplyDelete