Tuesday, August 26, 2014

Recipe: Iceberg Wedge Salad

Good Morning Sisters!

I am very excited about the great response I received from last week's announcement of the Savings for Sisters blog.  It's nice to know that the letter is appreciated!  I hope everyone enjoys the new features and sees this as a positive change for Savings for Sisters.

Click HERE if you missed last week's post or need help navigating the blog.

Last weekend my daughter and I went to the musical Wicked, and before the show we ate at The Cheesecake Factory.  We got there ahead of the Friday night rush to allow plenty of time to peruse the very long menu.  All around us people were enjoying delicious looking creations, and I had a hard time choosing what to order, finally settling on Chicken Marsala, a dish I have made at home (and featured some time ago in Savings for Sisters).  When my plate arrived I was disappointed to find that I really didn't like it as well as my home-cooked version. The mushrooms were plentiful and delicious, but the pasta was very undercooked--so much so that I couldn't chew it at all and had to leave it behind.  I also felt the sauce wasn't as flavorful as my home version.  It's not often I enjoy a dish of my own more than having the same thing in a favorite restaurant, but this was one of those rare occasions.

It got me thinking that there are probably two reasons most people eat out.  First, they want to enjoy a nice meal they had no hand in preparing (this is my biggest reason!)  Second, they get the chance to try things they don't know how, or have any desire, to make themselves.  This second reason is becoming less and less common now we can search the Internet for how to make almost anything at home--complete with pictures and step-by-step instructions.  If so inclined, the home cook can become quite skilled at creating restaurant-quality meals.

Today I want to share a simple yet impressive restaurant-inspired idea for jazzing up a special meal for guests or just Sunday dinner for the fam:  Iceberg Wedge Salad.  Below are very easy instructions for how to make this, including tips for cleaning and crisping your head of iceberg as well as selecting and saving on what has become a very expensive item--bacon.

Speaking of bacon, two summers ago one could purchase Maceys Big Buy bacon for $.99 a package when it went on sale.  Now the everyday price is $2.99, and I haven't seen a sale on it all summer.  Even at this price, however, it's still the best buy around right now.  You have to examine packages through the window at the back and be very selective, but your patience pays off when you run into packages that are even leaner than the best name brands.
Here's a picture of a package I brought home recently.  I think you'll agree this looks like premium bacon--but as I said, you may have to look at 8 or 10 package before finding one like this.  For best flavor and quality, look for bacon that is light in color, more pink than red.
Iceberg Wedge Salad
The day before serving:

1.  Take your head of lettuce, turn it so the core side is down, and whack it hard on the countertop.  The core will then pop out easily.
2.  Hold the lettuce under cold running water so that the water runs in through the core opening.  Dump the water out each time the head fills up.  Don't have the stream of water so forceful that it breaks the head.
3.  When you feel it's clean, place the head in your lettuce bowl the drain, core end down.  Leave out for about a half hour, dumping the water that has accumulated in the bowl before refrigerating. 
4.  Cover tightly and leave in fridge several hours or overnight.


Making the Salad:

1.  Fry several strips of bacon, cool, and break into small pieces.
2.  Core and quarter 2 or 3 tomatoes, removing seeds with thumb, then dice small.
3.  Peel and slice up a bunch of green onions, discarding the dark green tops.
4.  With large, sharp knife, divide the head of lettuce carefully into 6 or 8 wedges (depending on how many you need and how big you head of lettuce is).
5.  Drizzle each wedge with a good quality refrigerated Chunky Blue Cheese or Ranch Dressing, such as Lighthouse or Marie's.

 
6.  Sprinkle on the tomatoes, green onions, and bacon.
7.  Serve immediately or refrigerate briefly until ready to serve.

  Don't forget to scroll down to see the "Tip of the Week" below.

Tip of the Week: Rice!

You know how there are certain kitchen appliances you never use and others you use all the time?  My Rice Cooker gets used all the time, and what's funny is that I rebelled against the whole idea of one until a couple of years ago when the clouds parted and the bright light of morning streamed through.  What was I thinking?  That I enjoyed standing over my stove with my ear to a covered pot, listening for the beginnings of a simmer so I could start timing, casting kitchen prayers heavenward that when the timer dinged and I opened the lid it would be one of those infrequent moments when the water had all disappeared and a lovely pan of fluffy rice appeared to grace my table?  More often, I settled for either dry, undercooked kernels or soggy, glumpy clumps, with the occasional glorious success in between to sustain me.

Well no more. With the advent of Christmas 2012 dawned a new day of happiness, when daughter number two presented me with the beautiful, gleaming machine you see below.  I really think it deserves a cute name, I love it so much.  But for now, let's just call it Rice Cooker.  Rice Cooker leaves all guesswork out of the picture.  You dump in rice, water, salt, and butter, shut the lid, turn it on, and never think about it again until some 20 or 30 minutes later (who knows how long?  I don't care anymore!) when it decides--it decides--that the rice is perfectly cooked.  Then a sweet little bell rings, and Rice Cooker switches to a keep-warm feature until the rest of the meal is ready and you can fluff and eat--right out of the pan if you wish.  It's so beautiful, who needs a serving bowl?

Life has a whole new meaning since Rice Cooker came, and even yesterday, when I had to make 130 servings for the YSA Hawaiian Haystacks dinner, every batch turned out perfectly (all ten of them).  By the way, when you have to make a large quantity of rice like I did yesterday, just cool the rice in fridge, spoon into gallon sized zip-lock bags, heat the individual bags one at a time in the microwave when ready to serve (squishing the rice around a bit in the bag to break it up) and it comes out tasting like you just made it.

One thing I should point out:  Even though you can usually just follow the instructions on your bag of rice, for large quantities like this the water/rice ratio may have to be experimented with once and adjustments made.  Then make note of the proportions (like I did for the Jasmine rice I made yesterday) so that when you go to do the same thing again you won't have to reinvent the wheel.  The 15-serving batches I made yesterday consisted of  4 cups of rice, 6 cups of water, 3 teaspoons of salt, and 2 Tablespoons of butter.  It was perfect.
  
NOTE:  If you desire your rice to have a less sticky texture, rinse well and drain before cooking--especially imported rices such as Basmati and Jasmine.  You will see the water turn cloudy, which means you are rinsing off the starches that can make the rice more sticky.  Rice grains are so small, they may fall through the holes of a regular colander, so I recommend using a wire stainer for this task.  (For Basmati rice, soaking for an hour or two is recommended as well).

Tuesday, August 19, 2014

Recipe: Hawaiian Haystacks

My husband is in the bishopric of a USU ward, and every year they plan a Luau night for the first activity as the students return to school.  This year we decided to have Hawaiian Haystacks.  This is a dish I tend to forget about and go for long periods of time without making; then when I have occasion to serve it I wonder why I waited so long!  It's a great meal for this time of year because of all the vegetables involved and is perfect for a large group because everyone can fix theirs up exactly how they like it.  Even if you have your own version, you may be interested in how I go about preparing it (see instructions at end of letter).  Next Monday night I'll be serving this to 130 hungry college kids, so just be happy you only have to whip up a small batch in comparison to feed your back-to-school crew!

Hawaiian Haystacks
(Serves 10)

3 cans Campbell's Cream of Chicken soup
4 (10 oz) or one large (50 oz) can of chicken or 6 chicken breasts, cooked and cut up
3 cups canned chicken broth (some of this can be broth from the canned chicken)
1 cup of evaporated (canned) milk
1 Tablespoon soy sauce
1/8 teaspoon or so black pepper
3 chicken bouillon cubes dissolved into 1/4 cup water in microwave
1 1/2 cups sour cream

-Place all ingredients except chicken and sour cream in slow cooker and cook on low about 5 hours. Add chicken for the last hour or so, breaking it up a bit if needed.  Stir in sour cream just before serving.  Taste and season as needed.


-Serve over cooked, white rice with the following toppings, letting everyone choose what they want and make up their own dish.
TOPPINGS
Green Onions
Crispy Chinese Noodles
Shredded Carrots
Frozen Petite Peas, thawed
Sliced or slivered Almonds
Coconut, toasted or plain
Pineapple tidbits
Grated Cheese
Diced Celery
Diced Bell Peppers
Sliced Black Olives
Diced, seeded Tomatoes
Mandarin Oranges
Soy Sauce

Note:  To make this in larger quantities for a big party, it can be multiplied using Family Sized Soups and large (50 oz) cans of chicken from Sam's Club or Costco and cooked slowly in Roaster Ovens. Four batches will fit into each roaster oven.  Be sure to stir often, as it will stick to the sides if the heat is too high.  Cook at about 225 to 250 degrees in the roaster oven for several hours before adding the chicken, and add sour cream at the end as explained above.

Tip of the Week: School Lunches

This year I will send a child off to start a new school year for the very last time.  Before I burst into tears, let's just jump right into my ideas for school lunches.  When my daughters were in high school, they didn't like taking a packed lunch to school, but they really loved me to make them homemade cinnamon bread, cut into thick slices and individually bagged to grab and stuff into their backpacks for lunch.  My son is a different matter--he's not the least self-conscious about carrying a fully stocked lunchbox, complete with sandwiches, fruit, and cookies.  Here's a few little tricks I've picked up along the way:

1.  PB&J sandwiches will be less soggy if you spread peanut butter on both pieces of bread with jelly in the middle.  This forms a seal between the bread and the jelly, jam or honey.

2.  Buy large bags of small hard rolls, layer on slices of ham, roast beef or tukey, then bag individually and freeze.  If the kids grab them straight out of the freezer as they leave, they will stay nice and cool until lunch, thawing slowly.  For those who like mayo or mustard, invest in individual little packs they can throw in and add to their sandwich later, as it won't freeze well on the sandwiches.

3.  Frozen water bottles are a good choice for lunch drinks, but you can also fill small drink bottles with juice and freeze.  This also helps keep the lunch cold.

4.  Bag your own chips from a large bag instead of buying the individual bags.  Do a whole bunch at once.  Same with carrot sticks.  Apple slices dipped in lemon juice won't go brown.

5.  Small thermos containers filled with canned pasta (spaghettios or ravioli) are a nice change of pace.  Fill the thermos with boiling water to heat it up, then let stand while heating the pasta in the microwave.  Dump out the hot water and add the hot pasta.  It will stay reasonably warm until lunch and be safe to eat, (as long as the kids don't finish up the leftovers on the way home.)  Don't forget to send plastic spoons.

6.  Finally, realize that no matter what you send for lunch, they will be starving again and begging for snacks when they walk in the door!


See you next week!

Tip of the Week: Freezing Fruit*


For my tip this week, I thought I’d tell you how I freeze my raspberries, since we had our first big picking this morning.  First, wash them well and drain them on dishtowels or paper towels lining a cookie sheet.  
When they are pretty dry, line another cookie sheet with tin foil, then lay the raspberries out on it one by one, not letting them touch.  Continue to do this on additional sheets until they are all finished.  Each time a pan is full, place it carefully in the freezer for a few hours until they are totally hard.  If you have a deep freeze, you can stack them by criss-crossing the pans. Then get your freezer zip-lock bags ready, lift up the tin foil off the pan by bending the sides together to form a funnel, and they will slide right down into your bags.  
You may need to bend the sheet of tin foil around a bit to loosen them, but once you do, they will slide right in.  Now they’re ready to use all next winter, grabbing out a handful at a time as you need them for smoothies, raspberry shakes, jello, cereal toppings, or whatever.  The nice thing about taking the time to individually lay them out like this is that they become just like tiny little ice cubes and you can just pull as many or as few out of the bag as you’d like.
You can do this for other types of fruit too. For example, you can cut peaches or nectarines into bite-sized pieces and freeze them this way. To keep them from turning brown, soak them briefly in a large bowl full of water with a teaspoon of lemon juice before laying them out to freeze. 

This kind of individually-frozen fruit is great for smoothies!


*Originally distributed July 2014

Recipe: Homemade French Fries and Utah Fry Sauce*

Have you ever had the experience of making something a certain way all your life, then finding out one day you had been doing it all wrong?  This is what happened to me last weekend when I decided to make Homemade French Fries to go with our Father’s Day dinner.  My husband was given an electric meat smoker by the kids awhile back, so he decided to try cooking ribs for its trial run.  Well, the ribs were excellent, but that’s not the story.  It was the fries!  Oh my goodness, they were so good we couldn’t stop eating them.  French Fries, the commonest food in the world--it was like the scales of darkness fell from our eyes to witness a whole new wonderful world of crispy, potato deliciousness!  Too bad deep fried food can only occur in my life about twice a year (Christmas Eve Egg Rolls and Halloween Spudnuts).  

The fries were fabulous because of the procedure demonstrated by my friend, “Pioneer Woman.”  Pioneer Woman, aka Ree Drummond (I may have mentioned her once or twice) did not invent this procedure, which involves soaking the potatoes to remove the starch, frying at a low temperature, then refrying later at a high temperature.  In fact, my husband, who served his mission in Belgium has told me for years that this is how he saw the street venders there make their fries, served with a variety of dipping sauces.  I didn’t really believe him—it just seemed so weird that you would cook them twice.  But lately I’ve been seeing people doing this on cooking shows, and when I did an internet search, there was Pioneer Woman, waiting with instructions, which I followed to the letter.  Now I’m going to share them with you, (with a few modifications) so we can all be happy.  Not to mention our kids, husbands, sons-in-law, neighbors, parents, and anyone else deemed worthy.  Two rules—you have to have the rest of the dinner ready before frying so you can gobble them immediately, and you have to mix up what we Utahns like to call “Fry Sauce” (much to the amusement of the rest of the country).  This will complete the whole decadent fry-eating experience.
Begin by peeling five pounds of potatoes, then cut them into sticks. If you have a French fry cutter, great, but if not, try to make them as uniform as possible.  Place them in a large bowl and cover them with cold water, then let them soak for at least two or three hours—up to 24 hours.

The soaking process removes the starch on the outside of the potato, which will help the fries achieve the perfect crispness.
After they’ve soaked, drain the fries, then lay them on a bunch of paper towels or a clean dish towel to dry them off. Blot the top of the potatoes to remove all the excess moisture.
Next, heat a pot of oil to 300 degrees, using a candy thermometer to monitor the temperature.
Working in small batches, add the potatoes to the 300 degree oil.  You don’t want the oil to cool down too much by adding too many.

Then fry the potatoes for 5 minutes. The key here isn’t to brown them at all…just to start softening them up.
Note: If you have children in the house, please be sure to put the pot on a backburner!

Drain them on (new, dry) paper towels.
Keep doing this until you’ve fried all the potatoes at 300 degrees.
Then…crank up the heat and bring to oil to 400 degrees. This will probably be at your stove’s highest temperature (but be sure to watch the thermometer).

Then batch by batch…
. . . throw them back into the oil and fry until they’re nice and golden and crisp.  Drain on a plate with a napkin or paper towel…

Then sprinkle them with sea salt.  Serve at once.

Utah Fry Sauce

If there's anyone out there who doesn't know this, Fry Sauce is made with Mayonnaise, Ketchup, and seasoning salt, in whatever proportions you like.  I like mine heavy on the ketchup for a healthier version (is it even OK to refer to such a concoction in the same sentence with the word "healthy?")  I like to use DeVerle's Seasoning Salt (that you can buy at Juniper Take Out), but any seasoning salt, or none at all, will do.  You basically just mix it up to your own taste.

*Originally distributed June 2014

Recipe: Beans, Potatoes, & Bacon*


Our family may be a bit strange because we all really love our veggies—particularly garden veggies--almost to the point of obsession.  When I was young, Mom often made us meals comprised mostly of vegetables, especially in the summer, and I have done the same for my children.  Our oldest as a two-year-old used to go crazy whenever we visited the produce section at the grocery store—“Pleeease can we buy some cabbage?” That always brought funny looks from our fellow shoppers!  My dad has been known to make a whole meal out of corn on the cob (We used to count the number of bare cobs stacked next to his dinner plate to see if it was a new record), and he still supplies fresh corn for all of us each summer.  We wait anxiously from May until the end of August for that first ripe tomato, and then enjoy tomato sandwiches every day until it freezes, along with canning dozens of quarts for the winter.  I can’t even count the number of cookie sheets filled with Crispy Zucchini this year, and don't even get me started on the joys of little new potatoes with Parsley butter.

But the vegetable masterpiece we long for most through the long, dreary days of winter is a simple, yet hearty, one-pot meal called, Beans, Potatoes, and Bacon.”  Yes, you do have to use the whole name when referring to it!  My sister’s family loves this so much (it’s her 10 year old son’s all-time favorite dish) that she has even been known to resort to store-bought green beans and red potatoes to make this for his birthday in May.  I made my first batch of the season last week (along with the baby beets and greens you see pictured above) and it seemed we could actually feel the vitamins coursing through our veins as we ate!  Not one scrap was left in the pot.  Now even though I’ve thoughtfully taken photos and recorded the entire process for you (as passed down from my grandmother whom I never met), I cannot guarantee the folks at your house will respond to it with as much delight as mine do.  It is one of those strange family things, after all. 

BEANS, POTATOES, and BACON


1. First get out a large pot. (If you have a choice, it’s better that it be bigger around than deep—like a Dutch oven more than a stockpot).  Place a whole bunch of fresh whole green beans in the bottom of the pot which have been washed very well and the ends snipped off.  I’m talking a huge handful of beans for each person—as much as you can grab with your hand.  Add salt.  For the amount you see below, which is a large pot to serve six, it needs 2-3 teaspoons.  You will need to adjust this if you make a smaller batch.  Add enough water to come up 2 or 3 inches in bottom of the pan (enough to steam the vegetables and have some juice when you are through).  Do not use too much water or it won’t have any flavor.  Don’t come anywhere close to covering the beans—just enough so when you swirl the pan around you can see the water down there and that it’s enough to keep the beans from burning after an hour of slow simmering.   


2. Start the beans cooking (covered) while you fry the bacon.  I use a pound of bacon when I want to serve 6 people.  When the bacon is crispy and fully cooked, open the pot lid and add the strips of bacon straight from the skillet across the top of the beans and close the lid back up.  Return to the bacon skillet and pour off most of the grease (see middle photo), then add a cup or so of water to the pan and place back on the heat, simmering and scraping with a metal spoon or spatula to get all the browned bits up from the pan. (This is the photo on the right.  It’s hard to see because it was steaming up my camera).  This step is important, as it’s where the flavor will come from.


3. When the beans are starting to soften, but only about half cooked, lay the red potatoes on top of the beans in the pot.  These should have the peelings removed by either squirting with a garden hose into a bucket (if they’re new potatoes from the garden) or scraping the peelings off with a paring knife.   Leave the small ones whole and cut the larger ones in halves or quarters so they are of uniform size.  Lay these on top of the bacon in the pot, pouring the liquid from the frying pan all over the top of the whole thing.  Sprinkle the potatoes with salt and pepper.  Don’t stir the pot—leave it in layers of beans, bacon, then potatoes.

4. Cover and continue cooking until potatoes are done (poke the largest one with a toothpick or fork) and beans are very tender, not crisp and half cooked.  The entire simmering time from when you first put the beans on will be close to an hour.

5. When everything is ready, serve straight out of the pot or place into a large shallow bowl.  Let everyone dish up their own individual bowls, making sure to get a little of everything.  Eat up--this is your whole dinner (except maybe some hard rolls or garlic bread). Everyone should be able to have a little of the juice in their individual bowls with their serving of beans, potatoes, and bacon.  Folks can season with additional salt and pepper to taste as desired.  

*Originally distributed July 2014 

Recipe: Stuffed Zucchini & Restaurant Baked Potatoes*

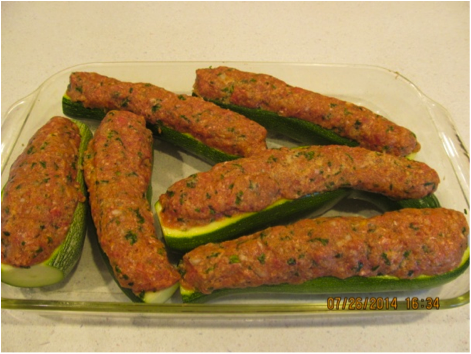
Upon returning from our trip to Wisconsin, before even going into the house, I rushed out to the garden to see my gigantic tomato plants, rows of green beans ready for picking, and the expected abundance of zucchini and yellow crooknecks.  Cucumbers, beets, and red potatoes were looking robust as well, despite two week’s growth of monstrous weeds.  I couldn’t wait to dig in, so Stuffed Zucchini was on the menu the very next night.  My mother created this recipe sometime in the mid 1970’s after our family fell in love with a similar version at a restaurant called “Grandma’s” on a trip to Salt Lake.  We had never tasted anything like it before.  The restaurant closed soon after, but this dish has endured to become a summertime family favorite for going on four generations now.

If you are interested in trying it, I have provided step by step instructions and photos.  If you don’t have a garden or generous neighbors who do, you’ll be happy to see that zucchini is part of the “Fill it Fresh” sale at Macey’s this week.

The stuffed zucchini went well with my “Restaurant Baked Potatoes,” also explained below.  Basically this involves rubbing Russet potatoes with oil and rolling them in coarse sea salt, then baking at at 400 degrees to achieve that crispy outside/fluffy inside effect people enjoy at places like Texas Roadhouse.  

Stuffed Zucchini
-Use small zucchini, (one for each person) shave a slice off the top, and carefully hollow out insides with a small spoon, mostly just removing the seedy middles. Throw the insides away. Get out an oblong casserole dish and make sure they’re all going to fit. You want them tight so they don’t roll around.
-Lightly salt the insides and set aside.

Meat Filling:  1 1/2 lbs of at least 85% lean ground beef, about ¾ cup ketchup, 2 large eggs, 2-3 cups ground soft bread crumbs (thaw and grind whatever leftover rolls or buns you have in the freezer in your food processer), 1 1/2 teaspoons Worcestershire sauce, 1 large finely chopped onion, 1 small bunch minced parsley leaves (or ½ a bunch if it’s a big one), 1 1/2 teaspoons salt, scant ½ teaspoons black pepper.   Mix well with meat fork or your hands (do not over mix or it will make it tough).
-Stuff the zucchini firmly with the meat mixture, rounding up to get plenty of meat in and so it will look nice. 
-Cover loosely with foil and bake at 375 degrees for around an hour or so.  When the zucchini is tender but not mushy when pierced with a toothpick the meat should be browned and done, but you may want to test with a quick-read thermometer.
-At this point, carefully hold back the zucchini’s with a plate or metal oblong cake pan lid and tip the pan to drain off the water and grease that will have accumulated in the bottom of your pan (or just tilt the pan and spoon it out).

Sauce:  While your zucchini is cooking, make the sauce.

2 - 3 small cans of tomato sauce (not paste).  Put this in a saucepan to simmer very slowly while the zucchini is cooking.  You want to add some Italian seasoning, a large pinch of rosemary and basil leaves, a bay leaf or two, garlic salt, oregano, and a dash of Worcestershire.  You have to taste it after it has simmered awhile, then add more of whatever.  It gets a lot better as it simmers, so keep tasting it.  After the flavors have combined and it tastes good, just keep warm until the zucchini is ready.
-After you have drained the zucchini, spoon the warm sauce carefully over each zucchini and sprinkle with medium or sharp cheddar cheese.

-Put back in oven and turn it off.  Leave only for about 3 minutes to melt cheese.  Be careful when you lift them out of the pan (use a big spatula), as the meat will have formed into kind of a roll and it wants to fall out of the zucchini if you tip it too much.
Serves 6.

Restaurant Baked Potatoes

When I made the stuffed zucchini the other night, I also made my Restaurant Baked Potatoes.  Just rub clean, dry Russet potatoes all over with oil, then sprinkle or roll in coarse Sea Salt.  Bake directly on the oven rack (do not wrap in foil) at 400 degrees for about an hour. Poke with a toothpick to check for doneness.  (Note:  I never piece with a fork before baking, as I have never had one explode in the oven, and it leaves those ugly black marks inside after baking).

Tip of the Week: Cherry Syrup*

For those of you who have cherry trees or received some from someone who does, I have been finding various ways to use up mine.  They are very ripe, so we decided to try making some Cherry Pancake Syrup.  

Basically you just extract the juice using a steamer such as is pictured below (no need for pitting), then turn the juice into syrup by following the recipe on the pectin box for jelly, only use half the amount of pectin called for so it will be the right consistency and thickness for syrup.  At this point it can either be processed for long-term storage, or kept in fridge if you want to just make a quart or two.

                 
*Originally distributed July 2014

Recipe: Grilled BBQ Chicken*

These hot summer days call for lighter foods and easier meal preparation.  I’m often enticed by new grilling recipes, yet it seems I always come back to my old standbys, like BBQ Chicken.  This is what I made for our 4th of July dinner, and since I did change up my old method a bit, I thought I’d share it with you.  

My first rule of cooking chicken is to remove the skin.  If you need convincing as to the health benefits of this, you should have seen the amount of skin and fat I threw away—I’ll bet it weighed almost as much as my cleaned chicken did!  I worry about chicken getting done enough on the grill, especially dark meat, bone-in chicken, (which to my way of thinking is superior to boneless breasts since it doesn’t dry out), so I usually steam the pieces a bit on the stove before grilling—just to give them that little head start. This time, however, I decided instead to marinate it all day, allowing for an hour of slow cooking on the grill before we were ready to eat.  My husband is very patient with lengthy processes, so he carefully babied it along, turning as needed, until every piece was fully cooked and ready for the last minute sauce.  It turned out great and would work well for any large or small events you have planned this summer, or just dinner for the fam.  Easy to prepare and economical, you can usually find legs and thighs for $.99/lb, which is the price I paid for mine at Maceys last week.
Ingredients:
Chicken Thighs and Legs (Bone-in)
McCormick Grill Mates Roasted Garlic & Herb Seasoning
Lawry’s Seasoned Salt Marinade (or other flavor of your choice)
Sweet Baby Rays Honey BBQ Sauce (or other sauce of your choice)
  
1.     Skin all the chicken.  This can be done easily by pulling off the skin with a sharp paring knife (a paper towel is very helpful for grasping that slippery skin on the legs).  After pulling off the skin, use the paring knife to scrap off any pieces of fat you see. 

2.    Rinse all the pieces in cold water; pat dry with paper towels.

3.    Sprinkle the pieces on all sides with the McCormick Seasoning. 

4.    Place the chicken in a large bowl.  Pour the Lawry’s Marinade over the chicken and use hands to coat all sides.  You may not need the whole bottle, depending on how much you’re making.  Cover and refrigerate for several hours or overnight.  

5.    Cook chicken on low heat on the grill with the lid down for 45 minutes to an hour, until the internal temperature is at least 165 degrees.  It doesn’t hurt to get it a bit higher than this to ensure all pieces have reached that minimum temperature right next to the bone.
6.    Once the temperature is above 165 degrees, brush the BBQ sauce on both sides and continue cooking until desired crispiness (usually only five minutes more.  It will burn easily once the sauce is on, so keep an eye on it).

*Originally distributed July 2014