Tuesday, November 25, 2014

10 Tips for Black Friday Shopping


Hi, everyone! Jan's daughter Jessame here. Black Friday is my favorite holiday, so Mom asked if I would do a guest post this week to share my Black Friday shopping tips with you.

I know Black Friday shopping is intimidating to some people, but it can be a great way to find awesome deals on the gifts you've been wanting for your loved ones. In my experience, toys, movies, video games, electronics, and kitchen items in particular are often deeply discounted for Black Friday shopping. And with so many stores and online retailers trying to get in on their share of Black Friday spending, you will probably have many options to save money. Whether you're a Black Friday beginner or veteran, I hope these few tips will help you score some bargains this year! 

1. First of all, you should be aware that this year most stores will be opening their doors sometime on Thanksgiving night rather than waiting until Black Friday. If you don’t like the idea of going out shopping on Thanksgiving, you might want to keep an eye on the websites for your favorite stores. Many of them will start their sales sometime on Thanksgiving day, either at the same time as their in-store sales or even as early as 12:00 a.m. Thanksgiving morning. Kohls has already started their online sale. You can get on right now and get all the same things that will be available in store as long as supplies last. Amazon.com has also started their countdown to Black Friday with deals of the day and limited-time "lightening deals." Stores like Toys-R-Us, Walmart, and Best Buy have also started limited "pre-Black Friday" sales with items from their Black Friday ads and sometimes those of their competitors. In order to get the early Toys-R-Us and Best Buy deals, you do have to sign up for their free rewards programs, if you haven't already. (I make a point of signing up for every rewards program available at any store or restaurant I'm even remotely likely to patronize. I have an entirely separate email account set aside for this purpose. It's a great way to score extra deals on things you may be buying anyway!).

2. Start planning early by making your Christmas list now. Almost all of the ads—including Walmart, Target, Best Buy, Macy’s, and Kohl’s—are now available online, so you can plan out your shopping in advance. I like to start out at www.bfads.net. This great website has scans of the ads for all the different stores that you can peruse in one place. It also has convenient searchable lists of all the items in the ads. If you are looking for something in particular, you can simply type a keyword into the search bar at the top and it will pull up a list of all the advertised specials on items containing that keyword, organized by category. You can also narrow your search to particular stores or categories of items. For example, if I search "Lego Movie," I can quickly find out that Best Buy will have the best deal at $3.99 for the blu-ray.

3. Keep a running list on all the best Black Friday prices you’ve seen for the gifts you’re looking for. That way, if a better deal pops up before Black Friday, you will know whether you should grab it. For example, Amazon.com often adjusts their prices based on what other retailers are doing and often marks their merchandise down earlier in the week. If you find a deal that matches or beats the ones you've found at another store, you can grab the item then and there! If you're a member of Amazon Prime, you can get free 2-day shipping on any order. If not, you could try Amazon’s free 30-day trial of Amazon Prime to help you with shipping over the holidays. For everyone else, you can get free super saver shipping on any order over $35.


4. Keep an eye on deal blogs like freebies2deals.com and coupons4utah.com for great pre-Black Friday finds you don’t have to research yourself.

5. Start watching Amazon.com’s lightening deals. Lightening deals are short-term deals that come up throughout the day. You can usually scroll through them to see what is coming up so you know if you will want to be watching. This year, Amazon Prime members will be able to access these deals 30 minutes before everyone else. Once the deal starts, you'll want to put it in your cart right away because there are only a limited number of each deal available. The movies, toys, video games, and jewelry seem to go particularly fast. Once it's in your cart, you have fifteen minutes to complete the checkout process or the deal will be passed on to someone on the waitlist. If you don't get the deal in your cart in time, you can request to be put on the waitlist. Once you're on the waitlist you will want to stay on Amazon's website and wait for a yellow box to pop up at the top of the page telling you that you have a certain amount of time to claim the deal. If you’re going the super saver shipping route, you may want to think about how you could pad your order to reach the $35 threshold if a lightening deal comes up that is less than $35, since lightening deals are time sensitive and you will need to make decisions quickly.

6. Once you've figured out where the best deal will be on what you're looking for, try searching for the item on the store's website periodically throughout the week before Black Friday. Sometimes the deal will go live on the store's website early. This happens most often during the day on Thanksgiving. You may be able to grab it from the website and not have to go to the store at all! You can also compare prices on other retailers websites, because sometimes they will offer unadvertised discounts on certain items before Black Friday, especially when another retailer has included that item in their ad. And many stores even offer free shipping if you spend a minimum amount or free in-store pick-up if you don’t. For example, Target is doing free shipping throughout the holidays this year on any purchase---no minimum purchase required!


7. Look at the paper ads when they come on Thanksgiving Day and keep an eye out for mailers from your favorite stores before Black Friday. Even though you can do most of your research online, stores will sometimes send paper coupons with their ads, and some of these may be good only for in-store purchases. Plus, the paper will include ads for local stores that may not have ads online, such as Kitchen Kneads. Kohls has already sent mailers around with $10 off a $10 purchase cards to be used in-store only on Thursday night or Friday morning (I'm not sure if these went to cardholders, rewards members, or everyone, but keep your eyes peeled!). That's like having $10 cash handed to you, so check your recycle bin to make sure you didn't throw yours away and keep watching for other types of mailers from Kohls! In past years, they have also put pull-off stickers with a $10 off $10 coupon on their newspaper ad. 

8. When you go out to the stores on Black Friday (or on Thanksgiving night), try to go with a group so you can divide and conquer! You also might want to have someone start waiting in line for you because those lines can back up quickly. 

9. If you are planning to purchase gift cards, especially for restaurants, be sure to ask about gift card specials. Many restaurants give bonus gift cards at this time of year with gift card purchases. Even if you don't give these away as gifts, you can buy them for yourself and get the bonus cards if you're going to be eating there anyway in the near future---just think of it as pre-paying for your dinner. My favorite deal is Cafe Rio---for the last several years, they have given away a free meal card for every $25 gift card purchased on Black Friday only. I like to buy enough gift cards to support my Cafe Rio habit all year long.

10. If you miss anything on your list, don't forget about Cyber Monday! Many online retailers will have deals again on Monday and most will offer free shipping!

Have fun and good luck!

Tuesday, November 18, 2014

Recipe - Thanksgiving Yams

Happy Thanksgiving Sisters!
I sure wish this photo wasn't so blurry.  Maybe when I took it I was shaky from low blood sugar after getting up at 5 a.m. to put a 30 pound turkey in the oven!  You think I'm kidding, don't you?  Right now, "Turk Lurk" (the name we affectionately give our turkey every year), weighing in at 29.35 pounds, is slumbering blissfully in my freezer, purchased with Turkey Points earned from shopping at Maceys over the last couple of months.  He's feeling a little chilly, and really looking forward to a warm bath before becoming the center of attention just a little over a week from now.
And why, you may ask, do I need 30 pounds of delicious, moist (yes, it will be moist) turkey?  Just look at those hungry, happy faces, and tell me if they seem concerned about their ability to consume (OK, maybe not in one meal) that much turkey.  See that smirk on Grandpa's face?  He's pleased because after skipping breakfast in preparation, he's ready to do some serious "recreational eating."

Lucky for me, I have inherited my grandma's behemoth 1930's era Lisk Turkey Roaster.  Here it is, big enough to bathe a small child.  It barely fits into my oven.  People back then knew how to feed a crowd!  I had my husband hold it just to show how huge it is.
This roaster at least 80 years old.  Note the high domed, slightly concave lid, designed so the roaster would be self-basting.  It will handle my 30 pound bad boy with ease.
Here's last year's model. See how lovely and brown it comes out?  (And yes, it is filled with stuffing, although I also make a big pan outside of the turkey for dinner guests who prefer it).  If you are interested in instructions for how I make my two favorite parts of Thanksgiving dinner, Yams and Stuffing, see the end of today's post.

To help you prepare for your own Thanksgiving Feast, I have listed the best prices for many of the items you'll need.  Unless you have Turkey Points you need to redeem at Maceys, it looks like Smith's has the best price on turkeys at $.69/lb, (with a $25.00 purchase) followed by Lee's at $.87/lb.  Turkeys at Maceys are $.99/lb (Maceys holds its per pound price a little higher because of the turkey point promotion, which makes the overall purchase a bit less valuable than it would be if they matched the price per pound of the other stores).

Thanksgiving Yams

I know many people enjoy the popular yam casserole with marshmallows on top, so if that's a tradition in your family, no need to change.  I just wanted to share our family's way of making yams because it's my favorite part of Thanksgiving, along with the stuffing, and it's so simple that if you haven't ever made them before, or don't really like the marshmallow method, maybe you'd like to give these a try.  There are only three ingredients--yams, butter, and brown sugar, and they can be made ahead and be ready to pop in the oven during the last hour before dinner.  They are sweet and buttery--a perfect contrast to all the savory dishes.
First, I am very fussy when I select my yams.  I pass up those huge, ugly, stringy looking ones and look for some that are about the size of a large baking potato with about the same shape. They should be red-orange in color. 
Next, bake them in a 400 degree oven just as you would regular baked potatoes, for about an hour or so until tender when you test with a toothpick.  Do not overcook them, but make sure they are as soft as a baked potato when done.  Because they can drip sticky syrup on your oven, place a piece of foil between the oven racks to catch drips. 

Remove from oven and cool on counter, then refrigerate until cold.  Carefully peel them with a sharp knife, removing any stringy parts or blemishes of any kind.  Slice them into about 1/2 inch rounds, lining them up in a large, glass casserole dish. 
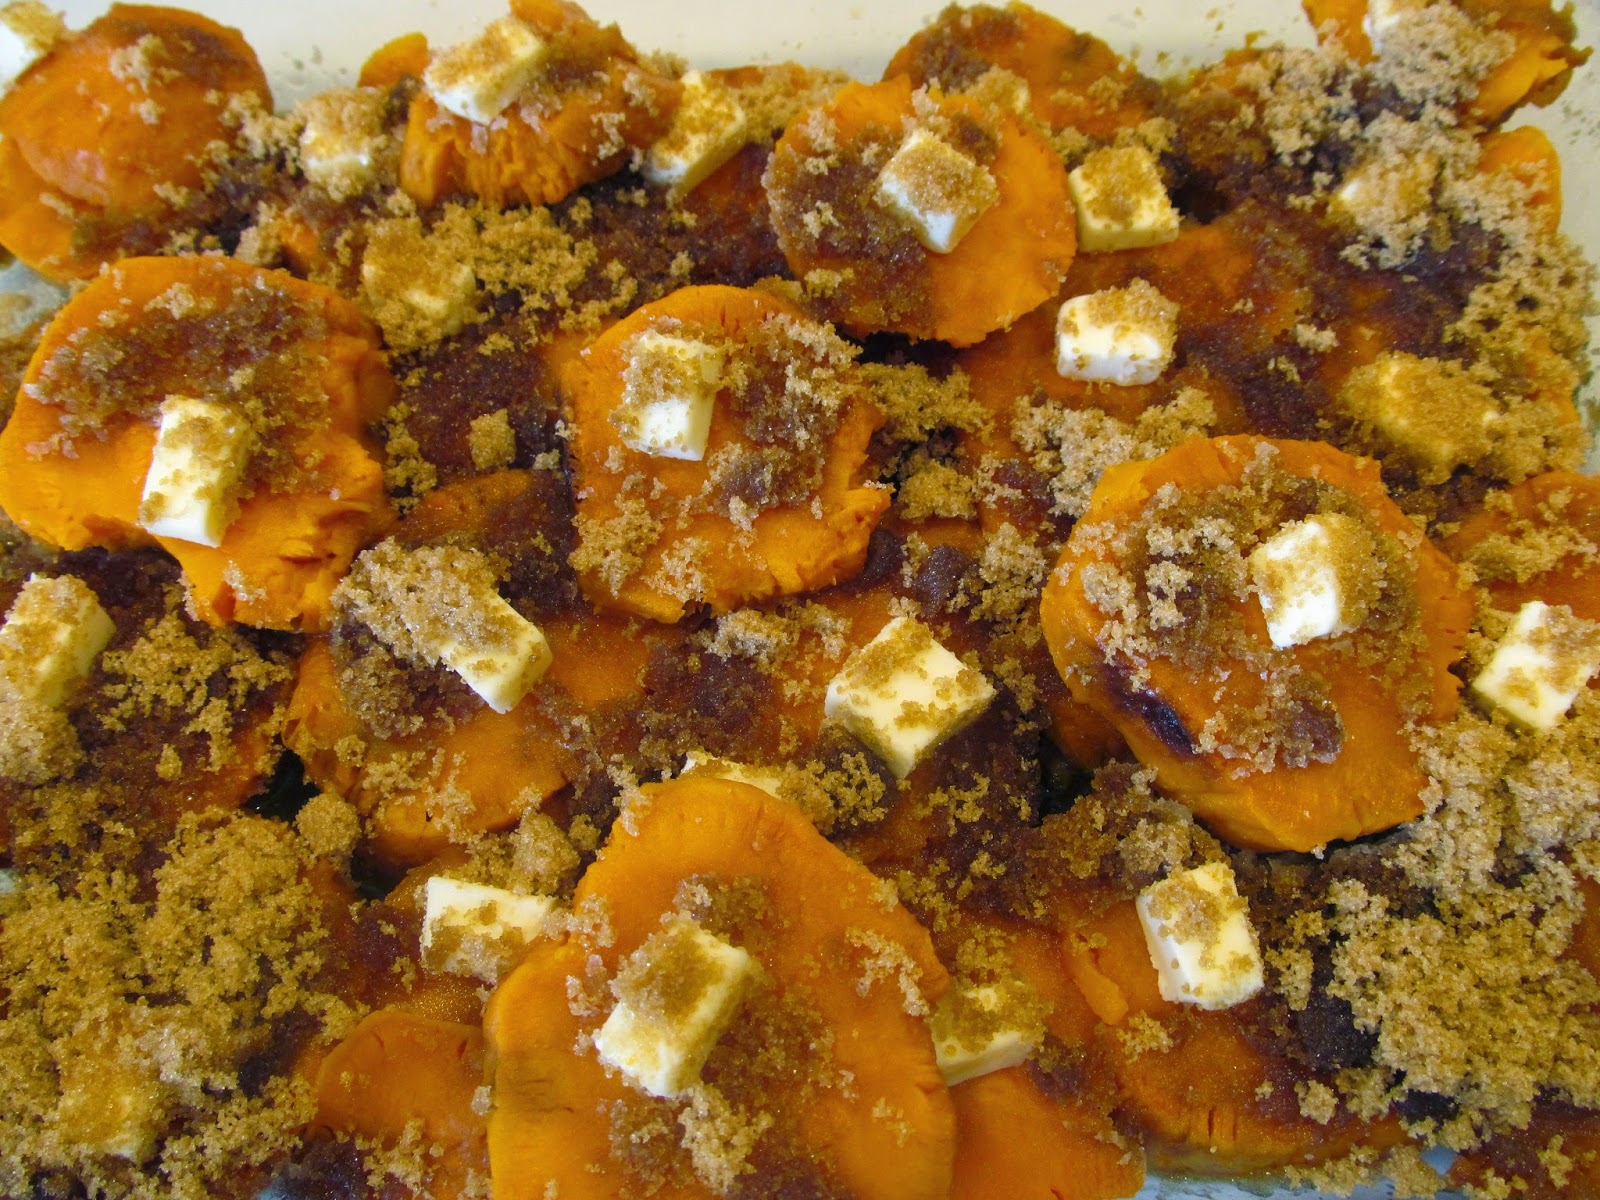
Sprinkle the slices with salt (but not pepper).  Place a small piece of cold butter on each slice, then top generously with brown sugar. 
They should look like this when they are ready for the oven.
Now cover and refrigerate for up to 24 hours, or place immediately in a 350 degree oven and cook, uncovered, for 45 minutes or so until heated through, bubbly, and very slightly crispy on top.  At this point, if the rest of the dinner isn't ready, cover lightly with foil and keep warm by turning the oven low.

Stuffing:  As with the yams, each family has its traditional stuffing recipe they like best, and ours is no exception.  If you are interested in seeing how I make stuffing, I would be happy to email you the recipe if you write me at jamjo@comcast.net.  It actually is more a list of instructions than a recipe, since it's one of those "Mom told me what to do" things.  A couple of years ago I compiled instructions for my sister, so just let me know if you would like it sent.  It's a very traditional bread, sage, celery, and onion recipe that I think most people would enjoy.  Here's a photo from last year:
This can be cooked either inside or outside the turkey (or both, which is what I do). 

Have a great holiday everyone! I'll see you here again on December 2.

Tuesday, November 11, 2014

Recipe - Thanksgiving Rolls

I hope lots of you got a chance to take advantage of the great prices at Smith's last week on storage items.  I spent several hours organizing my coupons for additional savings on the already rock-bottom prices on Land O' Lakes Butter, Carnation Evaporated Milk, and Campbell's Cream Soups, to name a few.  This is a good example of how you can't just assume that case lot sales are the best time to stock up on storage items.  I was glad to see that the Smith's ad for this week is repeating some of these best buys, so it isn't too late to snag these deals before they're gone.  Take a close look at the Smith's listing below.

Thanksgiving is just around the corner, so I thought I'd share my favorite homemade roll recipe.  I cut this out of the newspaper probably 25 years ago when I first got my bread mixer, and it has served me well all these years.  If you don't have a bread mixer, the dough can of course be kneaded by hand.  If you haven't attempted roll making before, this would be a good recipe to try, as it's very easy and takes basic ingredients to make light, fluffy rolls that will really make your Thanksgiving dinner special.
Nice as it would be to have hot rolls fresh from the oven just as Thanksgiving dinner is being placed on the table, this is impossible--at least for me.  For one thing, I don't have room for rolls to bake on Thanksgiving with all the other dishes taking up oven space.  So I have gotten into the habit of making rolls ahead of time, which I did today so I could take photos of the process for you.  Placed in freezer bags as soon as they cool, I can thaw these out on Thanksgiving morning, warm them carefully in a foil covered pan for a few minutes once the other pans are out of the oven, and I guarantee no one will know they are not freshly made that morning.  Thanksgiving is a little over two weeks away, but I'm confident these rolls will still be delicious--and I already have one task complete which will make my Thanksgiving much easier.  If you would like to try my easy roll recipe for your family this year, see my photos and instructions below.


Thanksgiving Rolls

1/2 cup Shortening
12 to 14 level cups of flour
1 cup sugar
5 teaspoons salt
4 large eggs
4 2/3 cups warm (not hot) water
4 scant Tablespoons Instant Yeast
1 1/2 stick melted butter

Note:  This recipe is the right amount for my large Bosch bread mixer.  If you have a smaller mixer, such as a Kitchen Aid stand mixer, you should cut the recipe in half.  Of course you can knead the dough by hand, but I have never learned to do this well, so I don't have any good tips or instructions about this for you.

Melt shortening in microwave and allow it to cool (but not to the point that it resolidifies).  Place a plate underneath in case it overflows when it melts.
Put water, sugar, and salt in bread mixer and spin around once or twice to dissolve.
In separate bowl, mix together about 4 cups of the flour and the instant yeast.  I use a product called Saf-Instant.  It comes in a square red package and is in the baking aisle at Maceys.  I have never used any other type of yeast, so I'm not sure how the recipe would work with non-instant types.
 
 Add the flour and yeast mixture to the mixer while it’s turning. 
Immediately add eggs, which are cracked in a bowl and waiting, then start adding some of the rest of the flour (which has been pre-measured) as well as drizzling in the cooled shortening. 
After gradually adding the flour, Let the mixer go for 3 or 4 minutes, then decide whether it needs more flour.
This is how it looks after adding a total of 12 level cups of flour. This looks like it needs a cup or two more flour.  While the mixer is running, grease a large bowl with shortening to be ready for the dough.
Run mixer for a total of 10 to 12 minutes.  You don't want to add more flour after the first 5 minutes or it won't turn out as well, so after about 4 minutes stop the mixer and look at and feel it.  I added an additional 1 1/2 cups flour after it had been mixing 4 minutes because I could see it was going to be too sticky and needed a bit more.  This is how it looked after running the mixer for the full 10 minutes:
This may look sticky still, and it is, but if you overdo the flour the rolls will be tough and heavy.  Once it is raised, it will be just right for rolling out and you will be able to handle the dough.  See how it mostly pulls away from the sides of the bowl, but some is still clinging on?  At this point rub your hands with shortening as if you were putting on lotion and take the dough out of the bowl, making sure to get it off the dough hooks and sides of the bowl.  Place it in the prepared bowl.
Cover well with plastic wrap and place in fridge for 45 minutes to raise.  You will most likely have to make room in your fridge for this big bowl.  In the winter you can raise it somewhere cool like your garage if you don't have fridge space.  This is the only recipe I have ever seen that raises the dough where it is cool instead of warm, and I don't question why, because it always comes out great!
While the dough is raising, prepare your counter top for rolling out the dough by washing, rinsing, and drying it well with paper towels.  Grease your pans and have them ready.  Once the dough comes out, you want to be able to move quickly or it will raise too much while you're trying to get all the rolls made.  You want to be as prepared as possible.
Now sprinkle flour on your counter and get your rolling pin and pizza cutter out.  Make sure to not put too much flour--just a thin layer.  Too much flour now may help you handle the dough, but you will be disappointed with the final product.  Smooth it out evenly with your hand.
When the dough in the fridge has doubled or more in size (about 45 minutes to an hour), remove it and divide into four portions.
See how great it looks!  Now take the first fourth of the dough, shape into a ball, and start rolling it out.  Flip it once, spread a bit of the flour evenly under it with your hand so it won't stick, then finish rolling out to about 1/4 to 1/2" thick.
The circle of dough will be about 12-14 inches in diameter.  Drizzle on some melted butter, then spread a thin layer out over the surface of the dough with your hand.
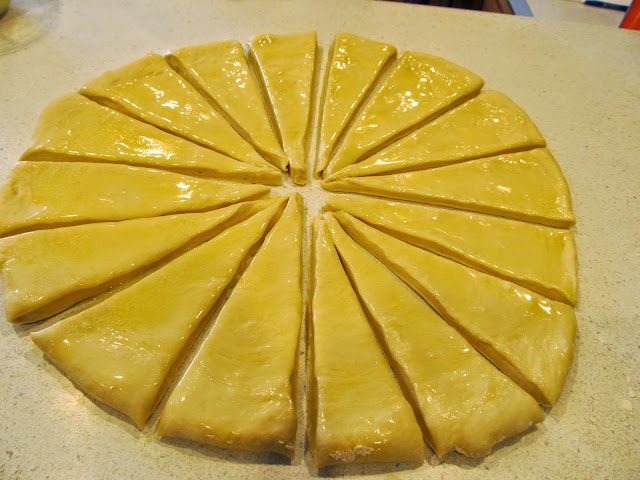
Cut into 16 triangles with your pizza cutter as you would a pizza.  First cut in half, then into fourths, then eighths, then sixteenths.  If you want bigger rolls, just divide it into 12 instead.
Starting at the fat end and moving towards the point, roll the pieces up into crescent shapes.  I actually use two hands to  do this, but no one was home to help me take pictures, so I was holding the camera with the other hand!
Place rolls on cookie sheet, making sure the point is tucked under, leaving room to spread.  In between rollings, clean drips of butter off the counter with a dry paper towel, lightly dust again with flour, then do the next portion of dough.  Work as fast as you can so the remaining dough won't over raise.
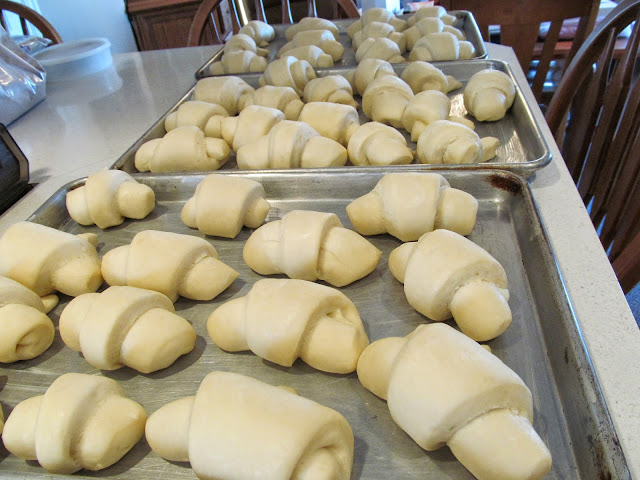
Place the pans in a warm place to raise for about an hour.  If your kitchen is warm, the counter is fine. Don't cover them.
Here's how they look when they're close to being ready for the oven.  Set the oven (or ovens if you have more than one) to 375 degrees.
Bake for 10 to 12 minutes, then butter the tops with the remainder of the melted stick and a half of butter.
Remove to cooling racks.  It should make about 50 to 60 rolls, depending on how big you make them.
Serve right away or place in freezer bags when they are entirely cool.  Thaw before rewarming at 350 degrees for about 10 minutes in covered pan.  My rolls are now ready for Thanksgiving.  Yay!
Do you have a boy similar to this one around the house?  For heaven's sake, make him some rolls!

Tuesday, November 4, 2014

Savings for Sisters - A Little Bit Country

I realize I've been on a bit of an apple kick these last few weeks, but it's just that time of year!  We even tried our hand at Caramel Apples for Halloween, thanks to helpful instructions from Caramel Apple Guru, Sister Amy Johnson.  They weren't as lovely as hers, but not too bad for beginners.
This is how Amy's apples look.
These are ours.  Not quite as impressive, but we had fun doing them!
You know how when your favorite TV program runs out of episodes for the season they show re-runs?  Well, this week's post is kind of like that.  I am working extra hours at my job this week so I can enjoy a rare and long anticipated visit from my sister, Stacey, who will arrive from Wisconsin on Tuesday for a 3-day visit.  So instead of taking the time to photograph and give instructions for a new recipe, I chose to take a week off and refer you to a very popular apple recipe featured in Savings for Sisters last year at this time--Country Apply Dumplings.  Many people commented last fall about how easy and delicious these were, and I agree!  Click HERE to see this recipe.
In keeping with the Country theme and my sister's upcoming visit, I want to tell you a bit about her old-time Country Store located in the Northwoods of Wisconsin.  After many years of stressful, fast-paced employment in the corporate world, Stacey took a gigantic leap of faith by giving up her successful career so she could have more time at home with her children.  Three years ago she and her husband sold their home in Sandy, Utah, uprooting the family to move to the small resort community of Manitowish Waters, Wisconsin, where they purchased an old store that had been closed for years.  Over the next few months they worked day and night to transform it entirely into a darling, old-fashioned, country themed establishment called Hogan's General Store.

This is how it looks now, not so different than when it was a small-town grocery store in the early fifties, serving both residents and the many summer visitors who come to fish and boat on Manitowish Waters.  The exterior still has that charming mid-century appeal.
The store is designed to look like a small town General Store from the past, offering not only groceries and a full-service butcher shop, but a deli serving daily homemade soups, salads, and sandwiches, with a comfy coffee nook where locals gather for a bite of food or drink and to catch up on events of the town.  (Here's an old photo from clear back when it was "Harry's Super Market."  Look at those old cars!)
 Stacey has worked her fingers to the bone to make all this happen, learning to live very frugally and giving up most luxuries the family once enjoyed.  I wanted to share a few photos of Hogan's General Store because I'm really proud of what they have accomplished.  My sister is a great example to me of reevaluating priorities and courageously setting off into the unknown to create a more meaningful life for one's family.
Stacey and her husband, Tom, redid the interior with new floors and shelving, featuring everyday groceries as well as local specialties.  An antique cast iron stove is the perfect centerpiece for the cozy seating area at the front of the store.  A dozen or so townsfolk, especially seniors, enjoy gathering here for breakfast each morning.
 My favorite part of the store is her gift shop area where she she sells vintage kitchen glassware and decor, hand-crafted items, and small toys.  A glass-enclosed case lines one wall, displaying her expansive personal collection of near-mint vintage Fisher Price Toys.  
 Even the tops of the coolers are a tribute to the "good old days."
Our whole family has enjoyed being involved in Tom and Stacey's venture. Mom keeps the store supplied with handmade items for sale.
Thanks to the Hogans for sharing their store with us!